- LCD display
- 기본연결 LCD (회로 & 코드)
- I2C 탑재된 LCD (회로 & 코드)
- 가변저항이 필요한 이유
LCD display address 찾기
LCD display를 사용하는 코드를 짜기 위해선
우선 우리가 가지고 있는 LCD가 어떤놈인지 알아야 합니다.
#include <Wire.h>

void setup()
{
  Wire.begin();

  Serial.begin(9600);
  while (!Serial);
  Serial.println("\nI2C Scanner");
}

void loop()
{
  byte error, address;
  int nDevices;
  Serial.println("Scanning...");
  nDevices = 0;
  for(address = 1; address < 127; address++ )
  {
    Wire.beginTransmission(address);
    error = Wire.endTransmission();

    if (error == 0)
    {
      Serial.print("I2C device found at address 0x");
      if (address<16)
        Serial.print("0");
      Serial.print(address,HEX);
      Serial.println("  !");
      nDevices++;
    }
    else if (error==4)
    {
      Serial.print("Unknow error at address 0x");
      if (address<16)
        Serial.print("0");
      Serial.println(address,HEX);
    }
  }

  if (nDevices == 0)
    Serial.println("No I2C devices found\n");
  else
    Serial.println("done\n");
  delay(5000);
}
코드에 들어갈 LCD display의 address를 찾는 코드 입니다.
LiquidCrystal_I2C lcd(0x27,16,2); // set the LCD address to 0x27 for a 16 chars and 2 line display
27에 들어갈 값을 찾아줍니다 :)

기본연결 LCD (회로 & 코드)

6개의 digital 핀이 필요해서, 핀 수가 적은 우노보드에서는 조금 부담되는 핀의 갯수입니다.
// Include the library:
#include <LiquidCrystal.h>
// Create an LCD object. Parameters: (RS, E, D4, D5, D6, D7):
LiquidCrystal lcd = LiquidCrystal(2, 3, 4, 5, 6, 7);

void setup() {
  // Specify the LCD's number of columns and rows. Change to (20, 4) for a 20x4 LCD:
  lcd.begin(16, 2);
}

void loop() {
  // Set the cursor on first place:
  lcd.setCursor(0, 0);
  // Print the string 'Hello World!':
  lcd.print("Hello World!");
  // Set the cursor on the third column and the second row:
  lcd.setCursor(2, 1);
  // Print the string 'LCD tutorial':
  lcd.print("LCD tutorial");
}
첫번째 칸부터 글을 쓰고,
두번째 줄 3번째 칸부터 글을 쓰는 코드입니다.
println으로 다음 줄로 넘어갈 수도 있습니다.


// include the library code:
#include <LiquidCrystal.h>

// initialize the library by associating any needed LCD interface pin
// with the arduino pin number it is connected to
const int rs = 12, en = 11, d4 = 5, d5 = 4, d6 = 3, d7 = 2;
LiquidCrystal lcd(rs, en, d4, d5, d6, d7);

void setup() {
  // set up the LCD's number of columns and rows:
  lcd.begin(16, 2);
  // Print a message to the LCD.
  lcd.print("hello, world!");
}

void loop() {
  // Turn off the display:
  lcd.noDisplay();
  delay(500);
  // Turn on the display:
  lcd.display();
  delay(500);
}
PWM핀을 최대한 피해서 사용해도 됩니다.
간단하게 프린트 값 하나 넣고, 껐다 켰다 하는 코드입니다.
I2C 탑재된 LCD (회로 & 코드)
위처럼 6개나 되는 핀을 사용할 필요 없이,
2개의 Analog 핀으로 컨트롤 가능하게 I2C가 탑재되어 있는 LCD를 구입하시면,
아래의 과정을 따라 가시면 됩니다.

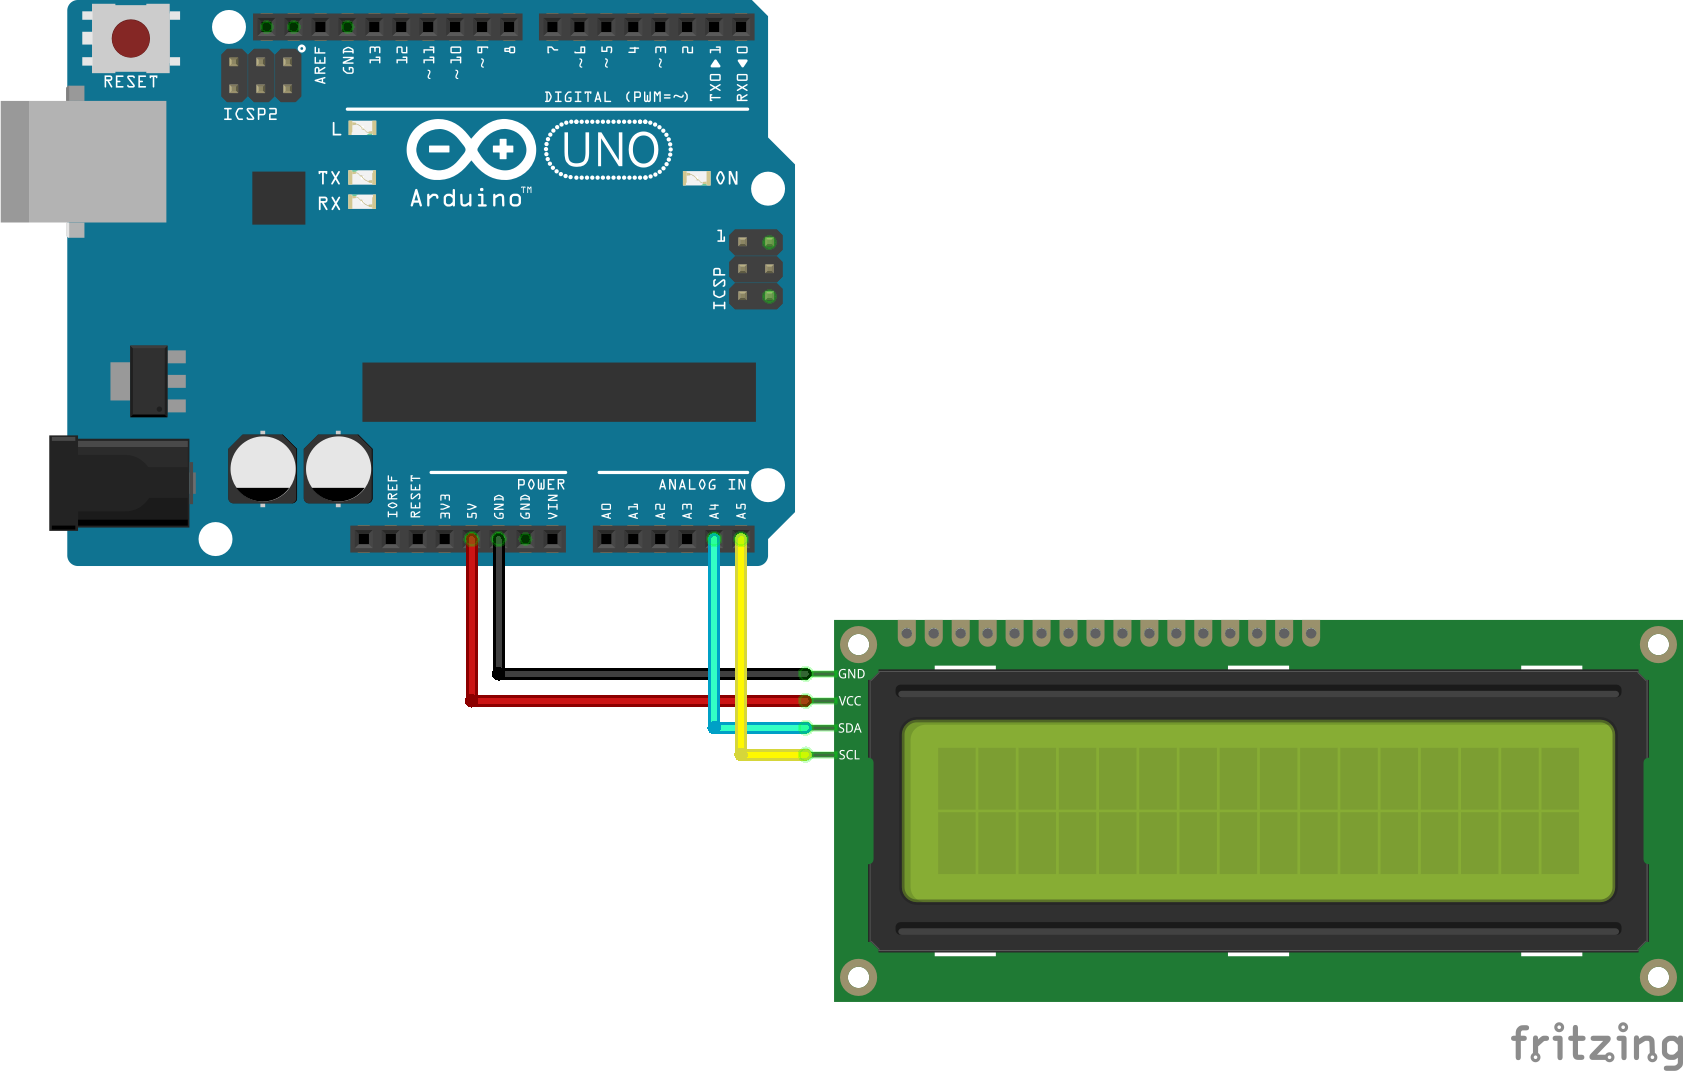
코드도 간단합니다.
라이브러리에 있는 코드를 사용하면 되는데,
우선 라이브러리에 필요한 내용을 넣어줄 필요가 있습니다.


/*
 * Displays text sent over the serial port (e.g. from the Serial Monitor) on
 * an attached LCD.
 * YWROBOT
 *Compatible with the Arduino IDE 1.0
 *Library version:1.1
 */
#include <Wire.h>
#include <LiquidCrystal_I2C.h>

LiquidCrystal_I2C lcd(0x27,20,4);  // set the LCD address to 0x27 for a 16 chars and 2 line display

void setup()
{
  lcd.init();                      // initialize the lcd
  lcd.backlight();
  Serial.begin(9600);
}

void loop()
{
  // when characters arrive over the serial port...
  if (Serial.available()) {
    // wait a bit for the entire message to arrive
    delay(100);
    // clear the screen
    lcd.clear();
    // read all the available characters
    while (Serial.available() > 0) {
      // display each character to the LCD
      lcd.write(Serial.read());
    }
  }
}
예제에 있는, 시리얼로 받은 내용을 LCD display에 표시하는 코드 입니다.
참고해서 필요한 코드를 짜시면 되겠습니다.
가변저항이 필요한 이유
가변저항이 없으면 글씨가 무조건 까만 사각형으로 나오게 됩니다. 그리고 가변저항을 돌리다 보면 어느 순간 글씨가 보이는데 그 글씨가 보이는 수준은 LCD마다 제각각입니다. 가변저항 달아두고, 본인 기준으로 가장 잘 보이는 밝기에 맞추시길 바랍니다 :)
마무리
온도센서로 읽은 값을 LCD에 표시
/***************************************************
  This is an example for the Adafruit Thermocouple Sensor w/MAX31855K

  Designed specifically to work with the Adafruit Thermocouple Sensor
  ----> https://www.adafruit.com/products/269

  These displays use SPI to communicate, 3 pins are required to
  interface
  Adafruit invests time and resources providing this open source code,
  please support Adafruit and open-source hardware by purchasing
  products from Adafruit!

  Written by Limor Fried/Ladyada for Adafruit Industries.
  BSD license, all text above must be included in any redistribution
 ****************************************************/
#include <SPI.h>
#include <Wire.h>
#include "Adafruit_MAX31855.h"
#include <LiquidCrystal_I2C.h>

// Example creating a thermocouple instance with software SPI on any three
// digital IO pins.
#define MAXDO1   3
#define MAXCS1   4
#define MAXCLK1  5
#define MAXDO2   12
#define MAXCS2   7
#define MAXCLK2  13

// Initialize the Thermocouple
Adafruit_MAX31855 thermocouple1(MAXCLK1, MAXCS1, MAXDO1);
Adafruit_MAX31855 thermocouple2(MAXCLK2, MAXCS2, MAXDO2);

// 0x27: address of I2C, 16x2 LCD
LiquidCrystal_I2C lcd(0x27, 16, 2);

void setup() {
  #ifndef ESP8266
    while (!Serial);     // will pause Zero, Leonardo, etc until serial console opens
  #endif
  Serial.begin(9600);
  // LCD initialize, turn on the backlight of LCD
  lcd.init();
  lcd.backlight();

  //set the start line of writing
  lcd.setCursor(0,0);
  lcd.println("MAX31855 test");
  // wait for MAX chip to stabilize
  delay(500);

  if (!thermocouple1.begin()) {
    lcd.print("ERROR1 ");
    while (1) delay(10);
  }
  if (!thermocouple2.begin()) {
    lcd.print("ERROR2 ");
    while (1) delay(10);
  }
  lcd.print("DONE");
  Serial.println("CLEARDATA");
  Serial.println("LABEL,Time,Int-T1,Int-T2,T1,T2");
}

void loop() {
  // basic readout test, just print the current temp
   lcd.clear();
   lcd.setCursor(0, 0);
   lcd.print("I.T=");
   lcd.print(thermocouple1.readInternal());
   lcd.print("/");
   lcd.println(thermocouple2.readInternal());


   double c1 = thermocouple1.readCelsius();
   double c2 = thermocouple2.readCelsius();
   lcd.setCursor(0, 1);
   if (isnan(c1)) {
     lcd.print("T1X");
     Serial.println("Something wrong with thermocouple1");
   }
   else if (isnan(c2)) {
     lcd.print("T2X");
     Serial.println("Something wrong with thermocouple2");
   }
   else {
     lcd.print("C=");
     lcd.print(c1);
     lcd.print("/");
     lcd.println(c2);
     Serial.print("DATA,TIME,");
     Serial.print(thermocouple1.readInternal());
     Serial.print(",");
     Serial.print(thermocouple2.readInternal());
     Serial.print(",");
     Serial.print(c1);
     Serial.print(",");
     Serial.print(c2);
     Serial.println(",");
   }

   delay(2000);
}

'서브 공부 > 아두이노 & 회로구성' 카테고리의 다른 글
| Thermistor(써미스터) 여러개 아두이노 우노에 연결하여 LCD에 띠우기 (0) | 2020.10.10 |
|---|---|
| Thermistor - arduino uno (써미스터 with 아두이노) - 온도 측정, 어떻게 할까 (0) | 2020.10.08 |
| Thermocouple 여러개, 아두이노 연결, LCD display 사용, 액셀에 데이터 실시간 정리 PLX DAQ (11) | 2020.10.04 |
| (저장용) Thermocouple amplifier 여러개 아두이노 연결 (0) | 2020.10.02 |
| Thermocouple(열전대, 써모커플), 아두이노로 값 읽기, MAX31855 증폭기 사용 (24) | 2020.10.02 |


댓글